Friday 30 July 2010

Ice Box Cookies

Ever heard of an ice box cookie? Me neither, until I got to the end part of this book: I ♥ macarons, when my sister made macarons. Simply because we had egg yolks left over and this was one of the recipes at the end of it. I decided that although I didn't know what icebox cookies were, I'd give them a go because they didn't require many ingredients and it looked fairly simply. Although these were named ice box cookies, they became known as left over cookies because I made them with left over... pretty self explanatory!


You mix all the ingredients together and then mould it all into a long long shape, and pop it in the fridge for a while to go hard, then slice it up and put them in the oven for 10 minutes.


They do look very tasty when they come out of the oven! 

Now, this is where the recipe says to leave them (and I know why- trust me, they're lovely!) However, as these are left-over cookies, I decided to ice them with some left over white chocolate ganache.


They went a bit dribbly,  but once I managed to yank them off of the tray, they were fine!
Oh, did I mention that ice box cookies are actually shortbread biscuits?!

Thursday 29 July 2010

Space Invaders

Just a quick little post to show you my latest creation:


Space Invader cupcakes! 
Now I got the idea from Hello Naomi while browsing through the Internet, and when I saw them I knew they'd just be a perfect little present for my boyfriend, so I quickly whipped up a few to take round to him, and this is how I did it...


I decided to make mine using these tiny little cases, as I had millions of them and I thought they'd look cuter.


I just used a simple vanilla cupcake recipe and baked batch after batch... after batch... I'm serious, want to see what I mean?


There were so many cupcakes... considering I only wanted 15!

Now for the icing. I'm slightly disappointed with how mine turned out in comparison to Naomi's ones, but none the less, this was my first attempt and the space invaders were extremely fiddly! However, this is how I iced mine.


First of all I tried using fondant dyed black, and glace icing to act as a sort of glue...


It sounded like it was going to work, but after using loads of food colouring, and what felt like an hour later...


It wasn't black enough and my hands were... well.. ruined! 
So I did cheat a tiny bit here, and I dug out some Dr Oetker coloured regal icing- much quicker, tastes just as good, and no mess! In a situation like this, I couldn't begrudge using it!


See, look how perfect the colour is! Anyway, roll it out and cut out circles which are a bit bigger that your cupcakes, this allows room for them to fold over the edge.


Glace icing, then the black. This is the basic cupcake, now all that was left was to decorate them. I didn't get any photos of this because I had to work quickly and I was getting a little stressed by the end of it! Those space invaders aren't easy to shape! But once they're all done, it's worth it. I thought it definitely was when I saw my boyfriend's face light up!

Oh, and one last thing... I also went a little over the top and made a box for them to go in:


I know, I know, not at all necessary, but it made it that little bit more special!
The box idea is great actually, especially if you are giving cupcakes as a gift. They're a lot easier to transport and really inexpensive! I get the feeling all of my cupcakes will come with a box now!

Wednesday 21 July 2010

Whoopie Pies!

Heard of a whoopie pie before? I thought you might have done.

Me and my sister have been looking at these for ages, and they've been popping up everywhere! So, today we went for a drive to our grandparents house then to Asda to get the rest of things we needed. 
This was our whoopie adventure: 


 Basic things really, chocolate and butter. Melted.


Sugar, eggs and vanilla extract. Whisked.


Two bowls. Combined.


Then mix in the flour and cocoa powder.


Done.


Then spoon blob fulls on to greased paper and bake for 6-8 minutes.
They do look lovely when they come out...


Then put a marshmallow on each one...


This photo makes me laugh. I don't know why... they look really funny...
Anyway... put them back into the oven for 2-3 minutes, to "melt them, melt them!" - to quote my sister!

Then you smush another one on top and leave them them to cool.

Lovely, lovely whoopies. So gooey and sticky and SO SICKLY! I ate one of these and felt like I'd just eaten a full Sunday roast. They are MASSIVE! Next time I think I'll make them slightly smaller and with more marshmallow. Of course, these aren't my own recipe... yet! I got them from this wonderful man- he's a genius!

Monday 19 July 2010

Rose Bushes

 I was debating whether to put these on here, as to be fair, they aren't the most dainty of things. When I made my Queen of Heart's Tarts, I had some mixture left over... and some new tins... and some raspberries. 

Now, normal people would have done this:


However, I decided to only do this to two cupcakes...for the rest...

I greased my tins...


I coloured my mixture...


And I baked them for 20 minutes...


Now, i'll fully admit they're not the prettiest of things at this stage, but once you tip them out and even out the top...


They still look fairly ugly.
But once iced...


They still looked a little mental, but the more I looked at them, the more I began to love them. These are definitely something I will be wanting to try again, maybe a tad more dainty the second time round. Yet, considering these are made from left overs- they're not to shabby at all!

The Queen's Tarts

I first saw these cupcakes in this wonderful little book at work: What's New, Cupcake?. It follows on from their first book 'Hello, Cupcake!', which is equally as adorable. When I saw them, I automatically thought they were just meant to be the Queen of Heart's tarts! So, I gave it a go. 

They're surprisingly simple to make, yet so delicious and adorable! Don't be put off by the idea of having to use a piping bag, it took me a little while to get it right, and in the end none of them were perfect, but they still looked fabulous. Want to see what all the fuss is about? 


Is it just me, or are they possibly the cutest form of cupcake ever? Actually, that could be argued, but for now, they're pretty cute, and they're incredibly simple to make.


Pretty standard ingredients: butter, sugar, eggs, flour and vanilla extract. Simple.


First things first, mix together the butter and sugar. 

Whenever I make cakes, I'll always mix the butter first to soften it up as much as possible before adding the sugar- not essential but a bit of a habit. Keep mixing it until everything goes almost white in colour and looks fluffy.


Then add the eggs. 

Now, we need to have a bit of a chat about eggs. People have very different opinions of how to add eggs. Some people say beat them first in a separate bowl, others say to add one at a time, some even suggest adding egg whites and yolks separately, but in my opinion, if you're using an electric whisk (or if you've got incredible stamina) you can just add them all in one go. If you're mixing by hand, then maybe two at a time, simply so it doesn't curdle. Anyway, at this point you need to add your eggs- however you like. 


Next things, well... next I suppose, is the flour.

Again, we may have to have a little chat about the flour. Now, I grew up making cakes with my nanny (to read more of this click here,) and she was always very particular about how cakes were made, including how ingredients were mixed, and what they were mixed with. When it came to the flour, it HAD to be FOLDED with a METAL spoon. Always metal, never wooden! It was like committing a sin to use a wooden spoon, let alone beat it rather than fold it! However, since I've invested in an electric whisk, I've gotten rather lazy and now do everything with that, so, following my mantra of 'chuck it all in at once', the flour goes in together. All of it. At the same time. If you're someone who likes to put milk in their cakes then you may prefer to do one third milk to one third flour until every thing's mixed up, it's entirely up to you, but if you've been baking using a metal spoon for folding flour, try this! It works just as well- sorry nanny! Also at this point, you should add in the vanilla extract.


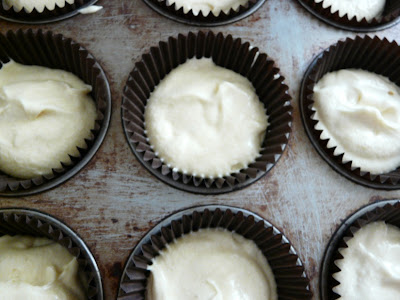
And that's it... violá! Into the cases they go. I used muffin cases for these because they allow me to make bigger cakes and still have space for icing them without overflowing and looking messy. When they're ready they go into a preheated oven (180c - sorry i don't know gas mark / Fahrenheit!) 

So, while you're 'tart' is cooking, you can begin to prepare the filling and the crust. For this you'll need:


Icing sugar, butter and jelly beans - LOTS of jelly beans! (This is of course, unless you have access to a shop that sells jelly beans in individual colours, because in that case, you'll only need the specific colours.)

So, now for the fun part... jelly bean seperating...

You thought I was kidding. Five packets, and what felt like several hours later, i'd seperated them all. Thinking back, this probably isn't essential, but none the less it makes it easier when you're icing the cakes. (It was also interesting to see that there were so many yellow beans when most people I know prefer red and purple ones... back to cakes maybe?)


So once you've done this, your cakes should be ready, here were my beauties before they got iced. I could have quite happily sat and eaten all of these, but I managed to only stick to one... just for testing... of course!

Allow the cakes to cool fully before icing them, if not the buttercream goes all slippy and it can sink into the cakes. Disaster. I didn't take any photos of my buttercream for 2 reasons. 1) I didn't follow a recipe so it took a couple of additions of sugar to get it right. 2) I didn't want to completely cover my camera in icing sugar. Not a good look.

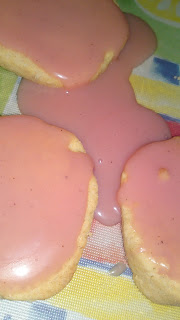
Anyway, make up a batch of buttercream using icing sugar and butter. I then used gel food colouring to tint it to look more like pastry (I wasn't overly happy with the shade of mine, but i got impatient before i could make it look just right.) Then ice them following these steps:


 Get a small amount of butter cream and put it in the middle of the cupcake. Don't go all the way to the edges, and don't make the layer to thick otherwise the jelly beans squish in too much.


Next, either strategically place, or simply pour on some jelly beans, (this is why I seperated mine- so the buttercream didn't set by the time i'd found 15 jelly beans of the same colour.)


 Next, get a piping bag and pipe straight lines straight across, then spint the cupcake round and pipe more lines so you make diamond shapes. 


 Then switch nozzles to one that is thin but slightly curved, (one day i'll post something to explain the nozzles im using,) and then pipe horizontally along the edge of the cake doubling bake on yourself to for a loop at the end, then turn the cake and repeat all the way around the cake. 


Again, i'm still not entirely happy with how the 'crust' turned out, so you may find a better way of piping than what i've done. Even so, i'm pretty impressed with how these turned out overall, and at the rate they disappeared, i'm pretty sure my family were too!

Related Posts with Thumbnails